
Friday, June 3, 2011
More Post-It Stamping Techniques - Ripped Post-It's
This is a simple 3x3 card, it is accomplished by ripping Post-It's and using it as a mask! The ink for the sunset and the hills are all sponged on. Once the landscape is in place, the greeting and the flowers were stamped on in black ink.
 Stamp Sets: Silhouette Sentiments (Hostess Set), Just Believe (#120453)

More Inspiration! Because I Care and Elements of Style Thank You
I made this card quite a while ago, but thought I'd share! This one was inspired by a card that I saw on the Stampin' Up! Demonstrator site. It is a "Floating Frame" optical illusion. The layers in the image of this card are only sponged ink! One of the most useful tools you can use... Post It's (and many were used!) were used to mask off sections while inking.
The flower image was stamped with Marker on Stamp technique using Elegant Eggplant and Old Olive Markers. The flower was then colored using only a Blender Pen! No other ink was added to that image! I then covered the image with Versamarker and heat embossed clear embossing powder overtop - it formed an emboss resist and made the colors pop again (which were faded to a chalk-like finish with the blender pen before the versamark).
 Materials:
Cardstock: Whisper White (#100730)
Designer Series Paper: Subtles Paper Stack (#117152)
Markers: Elegant Eggplant (#105110) , Old Olive(#100079)
Ink: Multiple from the Neutrals Collection (#119695), Elegant Eggplant (#105210)
Elements: White Embossing Powder (#109132), Clear Embossing Powder (#109130)
Tools: Stampin' Sponge (#101610), Blender Pen (#102845), Versamarker (#100901), Oval Punch Scallop(#119856), Oval Punch(#119855), Heat Tool (#100005)
Stamp Sets: Because I Care (Level 1 Hostess Set), Elements of Style (#120045)
The flower image was stamped with Marker on Stamp technique using Elegant Eggplant and Old Olive Markers. The flower was then colored using only a Blender Pen! No other ink was added to that image! I then covered the image with Versamarker and heat embossed clear embossing powder overtop - it formed an emboss resist and made the colors pop again (which were faded to a chalk-like finish with the blender pen before the versamark).

Cardstock: Whisper White (#100730)
Designer Series Paper: Subtles Paper Stack (#117152)
Markers: Elegant Eggplant (#105110) , Old Olive(#100079)
Ink: Multiple from the Neutrals Collection (#119695), Elegant Eggplant (#105210)
Elements: White Embossing Powder (#109132), Clear Embossing Powder (#109130)
Tools: Stampin' Sponge (#101610), Blender Pen (#102845), Versamarker (#100901), Oval Punch Scallop(#119856), Oval Punch(#119855), Heat Tool (#100005)
Stamp Sets: Because I Care (Level 1 Hostess Set), Elements of Style (#120045)
The Open Sea - Thank You Card

Materials:
Cardstock: Not Quite Navy and Cajun Craze (#119705), Naturals Ivory (#101849)
Ink: Not Quite Navy and Cajun Craze (#119693)
Designer Series Paper: Newsprint (#117166)
Elements: Rhinestones (#119246), Cherry Cobbler Bakers Twine (#123125)
Stamp Sets: The Open Sea (#123032), Thank You Kindly (#111700)
Tools: Stampin' Sponge (#101610), Blender Pen (#102845)
Wednesday, March 30, 2011
Inspired by a card I saw - a cute card for any occasion
I saw a similar card on the Stampin' Up! demonstrator site, and had to break out my stamping goodies. Remember you can get all the products in my online store. Tomorrow is the last day of Sale-A-Bration, so be sure to take advantage of free stamps with every $50 in purchases!
 Instructions:
Used Simple Friendship stamp set
Using Whisper White Cardstock
First stamped the large flower using Elegant Eggplant.
Colored the center of the flowers with daffodil delight, then dotted a little pumpkin pie in there
Used a blender pen to pull some of the purple around the center of the flower (to give it a lighter purple haze around the center of the flower).
Used a Versamarker to color over the flowers, added clear embossing powder, heated it.
Using Certainly Celery ink pad, inked up the small Music Notes wheel and ran it across the cardstock a few times.
Wipe off the excess ink from the embossed flowers (careful not to smear it onto the cardstock)
Using smaller flower and Elegant Eggplant, first stamped off on scrap paper, then stamp on card (this gives them a softer look).
Wipe off excess ink from Embossed flowers (taking care not to smear it on the card).
Using Always Artichoke, randomly stamp the swirl image around the flowers.
Wipe off excess ink from the embossed flowers (again making sure not to smear it on the card).
Using a Stampin' Sponge, sponge the entire cardstock with Certainly Celery (leaving center light)
Using same sponge, sponge around the edges of the project (and in part way) using Wild Wasabi ink.
Using same sponge, sponge around the edges and bottom using Garden Green ink.
Wipe the excess ink off the embossed flowers.
Using Elegant Eggpant ink and the large Butterfly stamp, stamp the butterfly image.
Mount on Elegant Eggplant and Daffodil Delight cardstock.

Used Simple Friendship stamp set
Using Whisper White Cardstock
First stamped the large flower using Elegant Eggplant.
Colored the center of the flowers with daffodil delight, then dotted a little pumpkin pie in there
Used a blender pen to pull some of the purple around the center of the flower (to give it a lighter purple haze around the center of the flower).
Used a Versamarker to color over the flowers, added clear embossing powder, heated it.
Using Certainly Celery ink pad, inked up the small Music Notes wheel and ran it across the cardstock a few times.
Wipe off the excess ink from the embossed flowers (careful not to smear it onto the cardstock)
Using smaller flower and Elegant Eggplant, first stamped off on scrap paper, then stamp on card (this gives them a softer look).
Wipe off excess ink from Embossed flowers (taking care not to smear it on the card).
Using Always Artichoke, randomly stamp the swirl image around the flowers.
Wipe off excess ink from the embossed flowers (again making sure not to smear it on the card).
Using a Stampin' Sponge, sponge the entire cardstock with Certainly Celery (leaving center light)
Using same sponge, sponge around the edges of the project (and in part way) using Wild Wasabi ink.
Using same sponge, sponge around the edges and bottom using Garden Green ink.
Wipe the excess ink off the embossed flowers.
Using Elegant Eggpant ink and the large Butterfly stamp, stamp the butterfly image.
Mount on Elegant Eggplant and Daffodil Delight cardstock.
Friday, March 11, 2011
March Stamp Club - Just Believe Stamp Set
Come and learn the Shadow stamping technique, and Second Generation Stamping technique.
Get a new cool Stamp Set, and enjoy some time crafting! Here are the 5 projects you'll make with your kit :)


 Class Options:
Clear - $25.95 (base stamp cost) + 2.60 (shipping) + 1.86 (tax) + $6 for kit = $36.41
Wood - $33.95 (base stamp cost) + 3.40 (shipping) + 2.43 (tax) + $6 for kit = $45.78
Sign Ups/Payments Due By Tuesday the 15th so the order is delivered in time!
DATES:
Friday the 25th - 12:30 - 3:30
Friday the 25th - 6 - 9pm
Saturday 12:30pm - 3:30pm
I am organizing a monthly Stamp Club without a monthly commitment. Every month, I will put together a set of cards featuring one of my favorite stamp sets ! Rest assured, I really like stamps that are very versatile, and the projects I put together show off their versatility and I am a technique Junkie, so I include a couple of those in the projects as well :)
For the class, you are purchasing the Stamp Set featured (yours to take home), and I also add a fee to the class to cover the materials for the cards you will be making in the class, I will supply a list of tools and inks prior to the class (once payment is received) and you can bring what you have, if you are missing some of these tools or inks I have no issues letting you use mine :). In the class you will make each card from scratch. Full printed, step-by-step instructions are also given to you for each project, for you to take home.
The Best thing about the club is that you can take some time out, enjoy the company of friends and enjoy stress-free card making :).
For the time being, I am limiting each time slot to 4 members. If this is something that becomes popular I will look into either bigger tables, or a better meeting place. For now I will have these events in my home.
If for some reason you can't attend a class, I can still provide your stamps, the materials for your kit and instruction sheets and either make a time to meet or I can mail it to you (I'd ask for you to cover the cost of shipping if this is desired, I have lots of flat rate boxes to do this).
I will ask for your name, address, and email information, so that I can enter the order in the online ordering tool with Stampin' Up!.
Payment is due up front - this is because when I order the stamps, I have to pay for them first :). I can take credit card, check or PayPal, whichever is most comfortable.
You are more than welcome to order more items from Stampin' Up! as well.
Keep in mind that Sale-A-Bration is going on right now and for every $50 ordered you can choose a free Sale-A-Bration item! (The $50 must be pre-tax and shipping and does not include the kit cost as this is above and beyond the stamp set).
Visit my online store to see what you can get to Sale-A-Brate!!
Get a new cool Stamp Set, and enjoy some time crafting! Here are the 5 projects you'll make with your kit :)


Clear - $25.95 (base stamp cost) + 2.60 (shipping) + 1.86 (tax) + $6 for kit = $36.41
Wood - $33.95 (base stamp cost) + 3.40 (shipping) + 2.43 (tax) + $6 for kit = $45.78
Sign Ups/Payments Due By Tuesday the 15th so the order is delivered in time!
DATES:
Friday the 25th - 12:30 - 3:30
Friday the 25th - 6 - 9pm
Saturday 12:30pm - 3:30pm
I am organizing a monthly Stamp Club without a monthly commitment. Every month, I will put together a set of cards featuring one of my favorite stamp sets ! Rest assured, I really like stamps that are very versatile, and the projects I put together show off their versatility and I am a technique Junkie, so I include a couple of those in the projects as well :)
For the class, you are purchasing the Stamp Set featured (yours to take home), and I also add a fee to the class to cover the materials for the cards you will be making in the class, I will supply a list of tools and inks prior to the class (once payment is received) and you can bring what you have, if you are missing some of these tools or inks I have no issues letting you use mine :). In the class you will make each card from scratch. Full printed, step-by-step instructions are also given to you for each project, for you to take home.
The Best thing about the club is that you can take some time out, enjoy the company of friends and enjoy stress-free card making :).
For the time being, I am limiting each time slot to 4 members. If this is something that becomes popular I will look into either bigger tables, or a better meeting place. For now I will have these events in my home.
If for some reason you can't attend a class, I can still provide your stamps, the materials for your kit and instruction sheets and either make a time to meet or I can mail it to you (I'd ask for you to cover the cost of shipping if this is desired, I have lots of flat rate boxes to do this).
I will ask for your name, address, and email information, so that I can enter the order in the online ordering tool with Stampin' Up!.
Payment is due up front - this is because when I order the stamps, I have to pay for them first :). I can take credit card, check or PayPal, whichever is most comfortable.
You are more than welcome to order more items from Stampin' Up! as well.
Keep in mind that Sale-A-Bration is going on right now and for every $50 ordered you can choose a free Sale-A-Bration item! (The $50 must be pre-tax and shipping and does not include the kit cost as this is above and beyond the stamp set).
Visit my online store to see what you can get to Sale-A-Brate!!
Sunday, February 13, 2011
Just Believe - Springtime Vintage
It's been a while since I posted so I wanted to get something out there. This is a creation that I came up with tonight - This is my second attempt at using this stamp set and Designer Series Paper together.

I used a Shadow Technique. This means the main image is stamped more than once. I first stamped the image in Bashful Blue, then using my stamp-a-ma-jig, I shifted the image over to the right a smidge and stamped the same image with Always Artichoke. It really has a neat effect!
I colored the sentiment and sentiment frame with Stampin' Up! Markers.
I also sponged the main image, sentiment and Springtime Vintage DSP using Crumb Cake ink.
Here's the supply list for the card above (remember - you can shop for these products and more in my online Stampin' Up! store):
Card Stock: Always Artichoke (#105119), Bashful Blue (#105120)
Ink: Always Artichoke (#105219), Bashful Blue (#105209), Crumb Cake (#121030)
Markers: Always Artichoke (#105113), Bashful Blue (#105111), Crumb Cake (#120967)
Stamp Set: Just Believe (#120453)
Ribbon: 5/8" White Organza (#114319)
Designer Series Paper: Springtime Vintage (#121782 - Occasions Mini)
Stamping Sponge (#101610)
Paper Snips (#103579)

I used a Shadow Technique. This means the main image is stamped more than once. I first stamped the image in Bashful Blue, then using my stamp-a-ma-jig, I shifted the image over to the right a smidge and stamped the same image with Always Artichoke. It really has a neat effect!
I colored the sentiment and sentiment frame with Stampin' Up! Markers.
I also sponged the main image, sentiment and Springtime Vintage DSP using Crumb Cake ink.
Here's the supply list for the card above (remember - you can shop for these products and more in my online Stampin' Up! store):
Card Stock: Always Artichoke (#105119), Bashful Blue (#105120)
Ink: Always Artichoke (#105219), Bashful Blue (#105209), Crumb Cake (#121030)
Markers: Always Artichoke (#105113), Bashful Blue (#105111), Crumb Cake (#120967)
Stamp Set: Just Believe (#120453)
Ribbon: 5/8" White Organza (#114319)
Designer Series Paper: Springtime Vintage (#121782 - Occasions Mini)
Stamping Sponge (#101610)
Paper Snips (#103579)
Sunday, December 12, 2010
Valentines, My Digital Studio, and a Sneak Peek of the 2011 Occasions Mini
So I went ahead and purchased My Digital Studio - and as I thought it was well worth the money. I am able to sketch out my card layouts prior to pulling out any paper or tools. This helps me a lot, because I tend to take a ton of stuff out while figuring out what to do with a card.
I gave myself a challenge this weekend, I wanted to get a head start on Valentines day. So I cracked open My Digital Studio and started designing my card. It was SO easy to do, and when I printed my "final" sketch, it printed to scale! So I was able to measure the size of my paper from the print out! The only issue I had, was that I decided to stamp a heart around the treat cup, so I had to make the squares matting the treat cup larger.
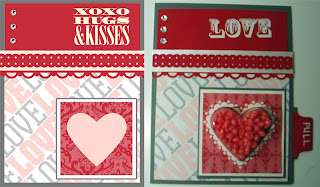 Here is the digital image of the project, side-by-side with the paper version I created. Here is also your sneak peek of some patterned paper (the diagonal LOVE paper) from the 2011 Occasions Mini Catalog (starts January 4th 2011) - also the digital stamp (also available in wood and clear mount) is also from the Occasions Mini (I don't own that physical stamp set - I only have it in Digital).
I used Versamark and white embossing powder for the Heart Stamp. For the "LOVE" title at the top of the card, I used the Versamarker and white embossing powder on my I {Love} Love jumbo wheel. On the tab I wrote Pull (on both sides) with the Versamarker and heat embossed with white embossing powder.
I used the Sweet Treat Cup and filled it with Nerds, the Pull tab opens a trap door where the recipient can get to the candy without tearing up the card. Also I used the heart that was punched out on the inside of the card, so once it is empty, you will see a nice striped heart through the window of the treat cup (instead of the white inside of the card).
Materials Are All From Stampin' Up - available 24/7 on my online store!:
I gave myself a challenge this weekend, I wanted to get a head start on Valentines day. So I cracked open My Digital Studio and started designing my card. It was SO easy to do, and when I printed my "final" sketch, it printed to scale! So I was able to measure the size of my paper from the print out! The only issue I had, was that I decided to stamp a heart around the treat cup, so I had to make the squares matting the treat cup larger.

I used Versamark and white embossing powder for the Heart Stamp. For the "LOVE" title at the top of the card, I used the Versamarker and white embossing powder on my I {Love} Love jumbo wheel. On the tab I wrote Pull (on both sides) with the Versamarker and heat embossed with white embossing powder.
I used the Sweet Treat Cup and filled it with Nerds, the Pull tab opens a trap door where the recipient can get to the candy without tearing up the card. Also I used the heart that was punched out on the inside of the card, so once it is empty, you will see a nice striped heart through the window of the treat cup (instead of the white inside of the card).
Materials Are All From Stampin' Up - available 24/7 on my online store!:
- Stamp Set - Sweetheart (# 120780)
- Jumbo Stampin' Wheel - I {Love} Love (# 117084)
- Jumbo Stampin' Around Handle (# 103661)
- Cardstock - Basic Gray,Whisper White [card base] (both from neutrals collection #119707), Real Red (#102482)
- Designer Series Paper - Real Red (Brights Stack #117155), Love Impressions (from 2011 occasions mini available Jan. 4)
- Sweet Treat Cup (#120435 - set of 12)
- Whisper White Satin Ribbon (#114616)
- Full Heart Extra Large Punch (# 119881)
- Scallop Trim Border Punch (#118402)
- Dotted Scallop Ribbon Border Punch (#119275)
- Round Tab Extra Large Punch (#119864)
- Basic Rhinestones (#119246)
- White Embossing Powder (#109132)
- Versamark Pad (#102283)
- Versamarker (#100901)
- Heat Tool (#100005)
Subscribe to:
Posts (Atom)