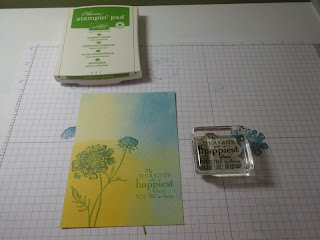
Sunday, December 29, 2013

Better than store bought - a handmade baby card and birthday card

This is a quick post to show you a couple cards I created this weekend. I needed to put together a couple cards for people that are special to me. A friend of mine is expecting a baby boy very soon, and my oldest son turns 12 in a little over a week. Here is what I came up with:
and the inside:
Tip: emboss the paper prior to die-cutting the shape

Materials

Bashful Blue Cardstock (retired)
Whisper White Cardstock (100730)
Wisteria Wonder Cardstock (122922)
Bashful Blue ink (retired)
Red Glimmer Paper (121790)
Baby, We've Grown Stamp Set (133086) *available Jan 3rd, 2014
Checkerboard Background Stamp (retired)
Everything Nice (inside sentiment - retired)
Hearts Collection Framelits (125599)
Owl Punch (for red heart) (118074)
Dots embossing folder (117335)
Adorning Accents embossing folder (for hearts) (125601)
Wisteria Wonder baker's twine (retired)
Big Shot (113439)

Here is a card I came up with for my son's birthday. I wanted him to know just how spectacular he is, so I used a lot of silver on his card. This card is slightly larger than the standard size (it is 4.5" x 5.75" - having an envelope to fit won't be a problem because I have an envelope punch board!). This is his card:
and the inside:

Materials

Whisper White cardstock -12x12 (124302)
Not Quite Navy cardstock (retired)
Brushed Silver cardstock (100712)
Christmas Star single stamp (134813)
One in a Million Stamp Set (c.126382, w.132052)
Gorgeous Grunge Stamp Set (c.130517 ,w.130514)
Itty Bitties stamp set (retired)
Silver Encore Ink (132142)
Not Quite Navy Ink (retired)
Rhinestones (119246)

You can get many of the materials used in these projects in my online store.

Thursday, December 26, 2013

Happy Thoughts and a Preview of Occasions 2014!

Earlier this week I received some of my pre-order goodies from the Occasions 2014 mini-catalog (which starts Jan 3rd, 2014). Within it is some of the most beautiful paper I've seen in a long time, it's called Watercolor Wonder designer series paper. It is quite stunning!

I decided to put together a quick project, I really didn't have a plan in place, so I just went with the flow. I came out with a cute flower card using the new Watercolor paper as the background.

Instructions

  1. Cut a 5.5" x 8.5" piece of Daffodil Delight cardstock for the card base, score in half at 4.25" and fold
  2. Cut a 4 1/8" x 5 3/8" piece of Island Indigo cardstock
  3. Cut a 4" x 5 1/4" piece of the Watercolor Wonder designer series paper
  4. Adhere Island Indigo paper to the Daffodil Delight card base
  5. Using the Field Flowers stamp set, stamp the stem in Gumball Green Ink directly on the Watercolor Wonder patterned paper
  6. Using the Stamp-a-majig, position the flower over the lower stem
  7. Ink the fill/background stamp of the largest flower in Island Indigo ink, then stamp off on scrap paper before stamping on the project (so the color is muted, which will be needed when we stamp the outline of the flower overtop)
  8. Repeat the above step, using the Stamp-a-majig and stamp the fill/background of the bud on the upper stem in Island Indigo ink
  9. Use the stamp-a-majig once more and ink the outline stamp of the largest flower with Island Indigo ink, this time stamping it at full strength on the project
  10. Repeat the above step, this time stamping the bud outline stamp at full strength with Island Indigo ink
  11. Stamp the sentiment in Gumball Green Ink to the right of the stamped flower
  12. Adhere Gumball Green ribbon across the top of the patterned paper, secure it with small squares of sticky strip (I also added a small square in the middle of the ribbon) - Tip: use graph paper to ensure you are putting the ribbon on straight!
  13. Adhere patterned paper onto the Island Indigo cardstock
  14. Tie a bow in Gumball Green ribbon (adhere with a glue dot), then add pearls beneath the sentiment

Materials

  • Daffodil Delight cardstock (119683)
  • Island Indigo cardstock (122923)
  • Watercolor Wonder Designer Series Paper (132994) *available January 3rd, 2014
  • Field Flowers Stamp Set (c. 122762, w.128583)
  • Gumball Green Ink pad (126861)
  • Island Indigo Ink pad (126986)
  • Stamp-a-majig (101049)
  • Basic Pearls (119247)
  • Gumball Green Ribbon (126848)
  • Sticky Strip (104294)
  • Snail (104332)
  • Glue Dots (103683)
  • Grid Paper (130148)
Visit my online store to purchase all of these items! Also I hear that new items are being added to the clearance rack tomorrow (Dec 27th 2013) - be sure to check that out and take advantage of some great deals!

Sunday, December 22, 2013

Rosy Christmas ? Creating a Christmas Wreath with Flower Stamps

I love it when a stamp set is versatile. For this project, we will be creating a Christmas Wreath card using the Stippled Blossoms (Roses) stamp set. This is an idea I've seen many times on the demonstrator website, I'm not sure who came up with the initial idea, but it has a fabulous effect!


Instructions

  1. Make card base out of Old Olive cardstock, 5.5" x 8.5" scored at 4 1/4" (fold)
  2. Die-cut Whisper White cardstock with the Top Note Die
  3. Put die-cut in the trimmer, line up the edge of the "curls" to the 3.5" mark on the trimmer.
  4. Using the 4th or 5th die in the Circles Framelits, trace lightly with a pencil to create a guide for your wreath
  5. With Old Olive ink, stamp the leaf outline stamp from the Stippled Blossoms stamp set using the penciled circle as a guide, then erase the pencil lines once the ink is dry
  6. Using the Stamp-a-majig position the sentiment from Teeny Tiny Wishes in the center of the wreath with Cherry Cobbler ink
  7. Using the Owl punch, use the smallest circle to punch out the berries
  8. Adhere clusters of three berries using crystal effects around the stamped wreath
  9. Tie a bow using Cherry Cobbler twine, and adhere to the top of the wreath with Crystal Effects
  10. Cut a 5 1/4" x 4" piece of patterned paper and adhere it centered on the card base front
  11. Adhere ribbon, using small squares of Sticky Strip on the ends to hold it securely when wrapping the card front
  12. Adhere stamped die cut lining up the left side with the patterned paper on the card front
  13. And last but not least, tie a bow in the ribbon and adhere it with glue dots

Materials

  • Stippled Blossoms Stamp Set (w.132076, c.126747)
  • Teeny Tiny Wishes Stamp Set (w.128748, c.127802)
  • Old Olive Cardstock (100702)
  • Whisper White Cardstock (100730)
  • Season of Style Designer Series Paper (132340) *only available until Jan 2nd, 2014!!
  • Old Olive Ink (126953)
  • Cherry Cobbler Ink (126966)
  • Old Olive Striped Organdy Ribbon (129291)*on clearance rack while supplies last!!
  • Big Shot Die Cut Machine (113439)
  • Circles Collection Framelits (130911)
  • Top Note Bigz Die (113463)
  • Owl Builder Punch (118074)
  • Red Glimmer Paper (121790)
  • Cherry Cobbler Twine (123125)
  • Crystal Effects (101055)
  • Stampin' Trimmer (126889)
  • Glue Dots (103683)
  • Snail Adhesive (104332)
Visit my online store to purchase the materials for this project. You can also score some great deals by participating in the Clearance Rack Blitz that is currently going on!

Saturday, December 7, 2013

Shaving Cream Technique - Northern Lights for Christmas

I've been wanting to try this technique for a while, I've wanted a few times to do a tie-dye effect, but today I was feeling a bit more calm. Anyway, there is an Inspiration Challenge this week on Splitcoaststampers that uses the Hollanders site for inspiration. This site has many beautiful decorative papers, and I am immediately drawn to abstract, color flowing patterns. I decided to use this as my inspiration to attempt to mimic the Northern Lights in a scene for a card.  Here is the final card:


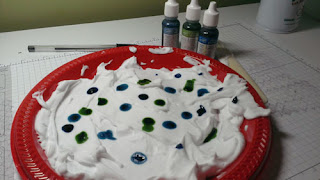
Let me outline for you the steps to the Shaving Cream Technique. I strongly suggest using rubber gloves, my fingertips are currently very colorful ;)

  1. Assemble Materials: Paper towels, Shaving Cream, Plastic Plate, Bone Folder, Re-inkers, White Cardstock and a pen. 
  2. Shake and spray Shaving Cream in a plastic plate, spread it across the plate with the bone folder.
  3. Apply drops of the lightest color re-inker to the shaving cream (this will be your most plentiful color)
  4. Apply drops of the second-lightest color re-inker (not as much as in #3)
  5. Apply a few drops of your darkest acccent color re-inker 
  6. Swirl the shaving cream making a design with the end of a pen
  7. Apply cardstock and press firmly (ensuring coverage of the entire sheet of paper)
  8. Remove paper and place on clean plastic plate
  9. Use bone folder as a squeegee getting the shaving cream off of the cardstock, then wipe cardstock with a clean and dry paper towel
  10. Let your project dry before using on a project


Here are a few creations that I came up with :) The left two use Marina Mist, Pacific Point and Wild Wasabi ink, the right use Perfect Plum, Marina Mist and (retired) Bashful Blue Ink.

Instructions for the card:

  1. Make card base with Basic Black cardstock 8.5" x 5.5" scored in half at 4.25"
  2. Cut a 5.5" x 4.25" Whisper White Cardstock panel, Emboss with Houndstooth embossing folder, then trim to 5.25" x 4". Adhere to front of card base with Sticky Strip (I find this works best to adhere embossed cardstock, I use a 1.5" strip in each corner, use a safety pin to easily remove the protective strip on top of the adhesive).
  3. Prepare a 5.5" x 4.25" Whisper White Cardstock panel with the Shaving Cream technique. This card uses Marina Mist, Wild Wasabi and Pacific Point re-inkers
  4. Stamp line of trees from Lovely As a Tree stamp set in Staz-On black ink
  5. Use glue pen to adhere glue to the ground area, adhere white flocking


  6. Trim stamped piece down to 4" x 3"
  7. Use white gel pen to apply highlights to the trees
  8. Mat with a 4.25" x 3.25" piece of Whisper White cardstock
  9. Mat once more with 4 3/8" x 3 3/8" piece of Basic Black cardstock
  10. Adhere stamped image/mats toward centered vertically and toward the right on the embossed cardstock, using Stampin' Dimensionals
  11. Adhere ribbon and tie bow using Glue Dots
  12. Stamp Merry Christmas sentiment from Teeny Tiny Wishes stamp set with Staz-On black ink on Whisper White cardstock, punch out with Word Window Punch.
  13. Punch Modern Label from Basic Black cardstock
  14. Adhere sentiment to Modern Label
  15. Apply Rhinestones
  16. Adhere using snail adhesive toward the upper right of stamped image

Materials (product number)

  • Whisper White Cardstock (100730)
  • Basic Black Cardstock (121045)
  • Marina Mist Re-Inker (119787)
  • Wild Wasabi Re-Inker (109020)
  • Pacific Point Re-Inker (111840)
  • Lovely As A Tree Stamp Set (w.128655, c.127793)
  • Teeny Tiny Wishes Stamp Set (w.128748, c.127802)
  • Staz-On Ink Pad (101406)
  • White Gel Pen (105021)
  • Rhinestones (119246)
  • Basic Black 1/8" Taffeta Ribbon (119261)
  • Word Window Punch (119857)
  • Modern Label Punch (119849)
  • Houndstooth Embossing Folder (123134)
  • Staz-On Stamp Cleaner (109196)
  • Stampin' Scrub (126200)
  • Big Shot (113439)
  • Snail Adhesive (104332)
  • Sticky Strip (104294)
  • Glue Dots (103683)
  • Stampin' Dimensionals (104430)
  • Stampin' Trimmer (126889)
  • Craft Scissors (108360)
  • White Flocking (I got mine online)
Purchase all these items and more at my online store!