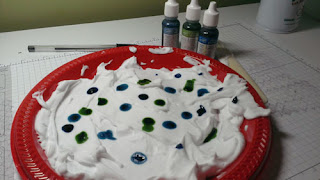
Let me outline for you the steps to the Shaving Cream Technique. I strongly suggest using rubber gloves, my fingertips are currently very colorful ;)
- Assemble Materials: Paper towels, Shaving Cream, Plastic Plate, Bone Folder, Re-inkers, White Cardstock and a pen.
- Shake and spray Shaving Cream in a plastic plate, spread it across the plate with the bone folder.
- Apply drops of the lightest color re-inker to the shaving cream (this will be your most plentiful color)
- Apply drops of the second-lightest color re-inker (not as much as in #3)
- Apply a few drops of your darkest acccent color re-inker
- Swirl the shaving cream making a design with the end of a pen
- Apply cardstock and press firmly (ensuring coverage of the entire sheet of paper)
- Remove paper and place on clean plastic plate
- Use bone folder as a squeegee getting the shaving cream off of the cardstock, then wipe cardstock with a clean and dry paper towel
- Let your project dry before using on a project
Here are a few creations that I came up with :) The left two use Marina Mist, Pacific Point and Wild Wasabi ink, the right use Perfect Plum, Marina Mist and (retired) Bashful Blue Ink.
Instructions for the card:
- Make card base with Basic Black cardstock 8.5" x 5.5" scored in half at 4.25"
- Cut a 5.5" x 4.25" Whisper White Cardstock panel, Emboss with Houndstooth embossing folder, then trim to 5.25" x 4". Adhere to front of card base with Sticky Strip (I find this works best to adhere embossed cardstock, I use a 1.5" strip in each corner, use a safety pin to easily remove the protective strip on top of the adhesive).
- Prepare a 5.5" x 4.25" Whisper White Cardstock panel with the Shaving Cream technique. This card uses Marina Mist, Wild Wasabi and Pacific Point re-inkers
- Stamp line of trees from Lovely As a Tree stamp set in Staz-On black ink
- Use glue pen to adhere glue to the ground area, adhere white flocking
- Trim stamped piece down to 4" x 3"
- Use white gel pen to apply highlights to the trees
- Mat with a 4.25" x 3.25" piece of Whisper White cardstock
- Mat once more with 4 3/8" x 3 3/8" piece of Basic Black cardstock
- Adhere stamped image/mats toward centered vertically and toward the right on the embossed cardstock, using Stampin' Dimensionals
- Adhere ribbon and tie bow using Glue Dots
- Stamp Merry Christmas sentiment from Teeny Tiny Wishes stamp set with Staz-On black ink on Whisper White cardstock, punch out with Word Window Punch.
- Punch Modern Label from Basic Black cardstock
- Adhere sentiment to Modern Label
- Apply Rhinestones
- Adhere using snail adhesive toward the upper right of stamped image
Materials (product number)
- Whisper White Cardstock (100730)
- Basic Black Cardstock (121045)
- Marina Mist Re-Inker (119787)
- Wild Wasabi Re-Inker (109020)
- Pacific Point Re-Inker (111840)
- Lovely As A Tree Stamp Set (w.128655, c.127793)
- Teeny Tiny Wishes Stamp Set (w.128748, c.127802)
- Staz-On Ink Pad (101406)
- White Gel Pen (105021)
- Rhinestones (119246)
- Basic Black 1/8" Taffeta Ribbon (119261)
- Word Window Punch (119857)
- Modern Label Punch (119849)
- Houndstooth Embossing Folder (123134)
- Staz-On Stamp Cleaner (109196)
- Stampin' Scrub (126200)
- Big Shot (113439)
- Snail Adhesive (104332)
- Sticky Strip (104294)
- Glue Dots (103683)
- Stampin' Dimensionals (104430)
- Stampin' Trimmer (126889)
- Craft Scissors (108360)
- White Flocking (I got mine online)


Amazing, gorgeous and inspiring. Thanks so much for sharing.
ReplyDelete