Sunday, December 12, 2010

Valentines, My Digital Studio, and a Sneak Peek of the 2011 Occasions Mini

So I went ahead and purchased My Digital Studio - and as I thought it was well worth the money.  I am able to sketch out my card layouts prior to pulling out any paper or tools.  This helps me a lot, because I tend to take a ton of stuff out while figuring out what to do with a card.

I gave myself a challenge this weekend, I wanted to get a head start on Valentines day.  So I cracked open My Digital Studio and started designing my card.  It was SO easy to do, and when I printed my "final" sketch, it printed to scale!  So I was able to measure the size of my paper from the print out!  The only issue I had, was that I decided to stamp a heart around the treat cup, so I had to make the squares matting the treat cup larger.

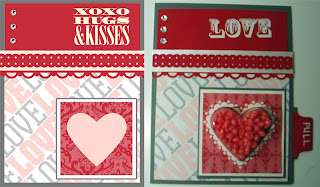
Here is the digital image of the project, side-by-side with the paper version I created.  Here is also your sneak peek of some patterned paper (the diagonal LOVE paper) from the 2011 Occasions Mini Catalog (starts January 4th 2011) - also the digital stamp (also available in wood and clear mount) is also from the Occasions Mini (I don't own that physical stamp set - I only have it in Digital).

I used Versamark and white embossing powder for the Heart Stamp.  For the "LOVE" title at the top of the card, I used the Versamarker and white embossing powder on my I {Love} Love jumbo wheel.  On the tab I wrote Pull (on both sides) with the Versamarker and heat embossed with white embossing powder.

I used the Sweet Treat Cup and filled it with Nerds, the Pull tab opens a trap door where the recipient can get to the candy without tearing up the card.  Also I used the heart that was punched out on the inside of the card, so once it is empty, you will see a nice striped heart through the window of the treat cup (instead of the white inside of the card).

Materials Are All From Stampin' Up - available 24/7 on my online store!:
  • Stamp Set - Sweetheart (# 120780)
  • Jumbo Stampin' Wheel - I {Love} Love (# 117084)
  • Jumbo Stampin' Around Handle (# 103661)
  • Cardstock - Basic Gray,Whisper White [card base] (both from neutrals collection #119707), Real Red (#102482)
  • Designer Series Paper - Real Red (Brights Stack #117155), Love Impressions (from 2011 occasions mini available Jan. 4)
  • Sweet Treat Cup (#120435 - set of 12)
  • Whisper White Satin Ribbon (#114616)
  • Full Heart Extra Large Punch (# 119881)
  • Scallop Trim Border Punch (#118402)
  • Dotted Scallop Ribbon Border Punch (#119275)
  • Round Tab Extra Large Punch (#119864)
  • Basic Rhinestones (#119246)
  • White Embossing Powder (#109132)
  • Versamark Pad (#102283)
  • Versamarker (#100901)
  • Heat Tool (#100005)
Digital "Sketch" from My Digital Studio Software - #118108

Sunday, November 28, 2010

2010 Christmas Stamp-A-Stack II

December 10th 6-8 pm and December 11th 2-4pm

Christmas has just snuck up on us! Are you ready with all your Christmas Greetings? 

I've scheduled my second Stamp-A-Stack event :)  For $20 you get to bring home 12 cards, 3 each of 4 designs, this also includes Stampin' Up! high quality envelopes.  All you need to do is bring your own adhesive, everything else is provided for you.

All supplies will be pre-cut, so you will only need to stamp, punch, sponge and assemble, easy-peasy. If you are new to stamping, it's not a problem, I will be there to assist and full instructions will be provided.

Register by emailing me - or by registering through my Meetup Group.

Here are the designs for this event:

Design #1 - Contempo Christmas
Design #2 - Christmas Postcard

Design #3 - Classic Christmas

Design 4 - Bells & Boughs

Friday, November 26, 2010

Bells and Boughs Christmas Card

Feeling a bit crafty, I needed a cardmaking fix this morning, here is my creation.  Inspired by Mojo Monday 166 :)


All supplies are from Stampin Up! - order them 24/7 at my Stampin' Up! online store.

Stamp Set: Bells & Boughs (#121142)

Cardstock: Whisper White (#100730), Cherry Cobbler, Always Artichoke (both from Regals collection #119705)

Ink: Always Artichoke, Cherry Cobbler (both from Regals Collection #119693)

Victoria Crochet Trim (#118481), Basic Jewels Rhinestones (#119246)

Wednesday, November 24, 2010

Why I would love to have Stampin' Up! My Digital Studio

My Digital Studio is a Digital Papercrafting program for your computer offered by Stampin' Up! .. It contains thousands of digital representations of authentic Stampin' Up! stamps, accessories (punches), designer series paper and embellishments.


The reason I would love to own a tool like this is two-fold.

1) I live far away from my family, so it's easier to share my creative projects digitally, also digital is a great way to send cards!

2) I spend hours upon hours debating my scrapbook layouts.  I would use this tool as a planning tool to save me countless hours sorting, finding, mixing and matching ink colors, cardstock, designer series paper, ribbon, embellishments and stamps.  All of this product will be available to me on my computer through this program to plan out my "physical" projects without the hassle of pulling out all of my stuff.  Plus with my laptop, I can plan my projects in more places, not just in my scrapbooking space.

My Digital Studio is now 1/2 off in the Online Spectacular Promotion - check out this promotion and others on my Stampin' Up! website :)

Friday, November 12, 2010

Artistic Etchings Sunset

As part of the Columbus Scrappers First Blog Hop we were challenged to create a card or layout using the following:
  • 3 Fall Colors
  • 2 Ribbons
  • 1 Word Title
Here is the creation that I came up with :)  I sponged the sunset and stamped the images using the Artistic Etchings stamp set.


Here is the map of your Columbus Scrappers blog hop route!  Visit Jana Next !


Jana: Slices Of My Life <---- go here next

All Supplies Used are Stampin' Up! Order these products and many more 24/7 at my Stampin' Up! online store!

Stamp Set - Artistic Etchings (#120573)
Designer Series Paper - Deck The Halls (#120810)
Ink - More Mustard (#103162), Cajun Craze (#119671), Early Expresso (#119670)
Ribbon - Victoria Crochet Trim (#118481), Very Vanilla Satin Ribbon (#117291)
Stamping Sponges (#101610) [quartered, comes in sets of 3]

Tuesday, October 19, 2010

Thank You Card - Mojo Monday 161

I was up to the challenge for Mojo Monday, I love the sketch!


I used second generation stamping (stamp first on scrap, then on the project) for the hydrangeas in the background using Sahara Sand.  I love the way it looks on Very Vanilla cardstock, it creates a nice subtle background image.  Concord Crush is quickly becoming my favorite color - Rich Razzleberry being a close second.

Supplies Used are all Stampin' Up!  - order these products through my My Stampin' Up web site 24/7 (and have it delivered to your doorstep) or contact me to schedule a workshop :)

Stamp Sets - Because I Care (hydrangea and Thank you - level 1 hostess set) #120118, Elements of Style (bird and swirl in tag) #120045

Cardstock - Very Vanilla #101650, Concord Crush #119792, Tangerine Tango #111349

Ink - Concord Crush #119785, Sahara Sand #105208

Designer Series Paper - Daffodil Delight from the Brights Designer Series Paper Stack #117155

Punches - Large Tag #119876 , 1 3/4" Scallop Circle Extra-Large #119854, Scallop Edge Border #119882, Dotted Scallop Ribbon #119275

Antique Brad #117273

Basic Pearls (smallest size in center of flower in circle punch, eye of bird, and in center of flower in tag punch) #119247

Crop-a-Dile #108362 - to make hole in tag for brad

Saturday, October 9, 2010

Crimper Poinsettia Christmas Card

1.  Cut a 5.5" x 5.5" card base (made by a 5.5 x 11 piece of cardstock scored in the middle) using Very Vanilla cardstock

2. Adhere a 5.5" x 5.5" piece of Cherry Cobbler cardstock to the card base using Snail adhesive.

3. Cut a 5.25" x 5.25" piece of Jolly Holiday Designer Series Paper with all 4 corners punched with a ticket punch was adhere it to the Cherry Cobbler cardstock.

4. Stamp Seasons Greetings from the Snow Swirled set using Cherry Cobbler ink onto Very Vanilla cardstock, cut out and then mat with Always Artichoke cardstock with an 1/8" mat. The greeting is adhered to the upper right corner of the Jolly Holiday DSP using Snail adhesive.

To make the poinsettia:

5. Cut 4 - 2" x 2" squares of Riding Hood Red Cardstock, score down the middle of each square at 1", fold in half

6. Cut 4 - 2" x 4" rectangles of Riding Hood Red Cardstock, score in half lengthwise at 1", fold in half

7. Cut 3 - 2" x 4" rectangles of Always Artichoke, fold in half

8. Load all of your folded squares and rectangles at an angle into your paper crimper and crimp [one at a time!].

9. Keeping the crimped pieces folded, keep fold line to the left, ensure the crimps are pointed upward. Just like in Kindergarten cut a shape of 1/2 a heart except for keeping the bottom flat instead of mounded, this is more like a 1/2 a raindrop than a heart. Do this to all folded pieces.

10. Open up the folds on each of the red petals. Ink them with a sponge dauber around the edges and over the creases of the crimps with Cherry Cobbler ink. Shape each petal as desired by running a bone folder on the back side to give it a slight curve.

11. Open the Always Artichoke leaves, ink them in the same way you did the petals using a Sponge Dauber and Chocolate Chip ink.

12. Arrange Red petals as desired onto a small piece of scrap paper. Once you have your desired look, adhere the petals to the scrap piece of paper using Glue Dots.

13. Arrange leaves underneath the petals as desired and adhere them with Glue Dots.

14. Stamp a small pattern stamp using More Mustard onto a scrap piece of Daffodil Delight cardstock (I used the dots square in the Playful Pieces level 3 hostess set)

15. Punch 3 of a desired flower shape from the stamped pattern using Boho Blossoms punch.

16. Using a Crop-A-Dile, punch a hole in the center of each yellow flower, add a red brad from the Regals collection.

17. Arrange yellow flowers in the center of the poinsettia, adhere with Glue Dots

18. Adhere poinsettia to the card using Glue Dots.

Supplies used are all from Stampin' Up! - Order online 24x7 from my online store and have the products delivered to your doorstep! - or contact me and we can setup a workshop where I can demonstrate any of the techniques shown on the projects on this blog :)

Cardstock - Very Vanilla (#101650), Daffodil Delight (from Brights collection #119706), Cherry Cobbler, Riding Hood Red, Always Artichoke (last 3 all from Regals collection #119705)

Designer Series Paper - Jolly Holiday (#117159)

Stamps - Playful Pieces (level 3 hostess set #120145), Snow Swirled (#111690)

Ink - Cherry Cobbler (#119669), More Mustard (#103162), Chocolate Chip (#100908)

Paper Crimper (#101618)

Ticket Corner Punch (#119867)

Boho Blossoms Punch (#119858)

Red brads from the Regals Collection (#119737)

Vintage Christmas Postcard

For this card, I adapted the sketch a little bit from the Mojo Monday 159 sketch.  I couldn't see putting a circle over the greeting, so I added three accent circles to the right of the greeting.

I absolutely love the look of Cajun Craze stamped on Crumb Cake.  Crumb Cake cardstock is also probably one of the best cardstock colors you can use to pull off a distressed look.  I used the Color Coach to choose the Garden Green as an accent color, and threw in some antique brads, and vintage-looking Designer series patterned paper to complement the look.

To create the sentiment, I first stamped the Christmas Postcard stamp with Cajun Craze ink on Crumb Cake cardstock.  I then used my distressing tool to rough up the edges on the cardstock, then tore the cardstock slightly at random spots.  I then "bunched" the cardstock, just along the edges to give the edges a crumpled look (without having to crumple the whole thing).  I then accented the distressing using my sponge dauber and Chocolate Chip ink.  

I then cut an accent mat for the greeting (cutting it long) using Garden Green Designer Series Paper from the Regals DSP collection, then tore the bottom and inked all the edges using my sponge dauber and Chocoloate Chip ink.  The distressed greeting was adhered to the mat using Stampin' Dimentionals.  Victoria Crochet lace was attached to the accent mat with Glue Dots, and I tied a knot with a separate piece of the lace on the front of the mat. 

I then covered the 5.5"x5.5" card face with a selection from the Deck The Halls Designer Series Paper, and adhered the mat with greeting and ribbon to the front of the card using Snail adhesive.

I punched 3/4" circles from scraps of the Garden Green Designer Series Paper and inked it with a sponge dauber and Chocolate chip ink, then punched 1" circles from the same Designer Series Paper that I mounted on the card front (only flipping it to show the coordinating pattern that was on the underside of the paper).  I used my Crop-a-Dile to punch a hole through the center, and attached an antique brad.  The circles were adhered to the card face using Glue Dots.

All products used are from Stampin' Up! -- Remember you can purchase these items 24x7 from my online store, just click the link on the upper right corner of this website :)

Cardstock - Crumb Cake, Very Vanilla (card base) (both from the Neutrals collection #119707)

Ink - Cajun Craze (#119671), Chocolate Chip (#100908)

Designer Series Paper - Deck the Halls (from Holiday Mini #120810), Regals Designer Series Paper Stack (#117154)

Antique Brads (#117273)

Victoria Crochet Trim (#118481)

Distressing Tool (from the Cutter kit #106958)

Stampin' Dimensionals (#104430)

Glue Dots (#103683)

Snail Adhesive (#104332)

3/4" Circle Punch (#119873)

1" Circle Punch (#119868)

Crop-A-Dile (#108362)

Color Coach (#121620)

Sunday, October 3, 2010

Christmas Card - Bells & Boughs

True to form this week's card is inspired by Mojo Monday 158 !  The Card Base is 5.5" x 5x5" and is actually made out of Very Vanilla cardstock, but I covered the entire face of the card with Always Artichoke cardstock.  I also went through my scrap paper and fussy cut selections from the Deck the Halls Designer Series Paper.  This card face was made entirely out of my paper scraps, which is something I need to keep doing so I don't get buried in a mound of partially cut paper!  I used water color paper and colored the stamp image in using aqua painters, which really is one of my only options as I don't own many Stampin' Up! markers yet.


Supplies Used:

Cardstock - Very Vanilla, Always Artichoke, Water Color paper
Patterned Paper - Deck The Halls Designer Series Paper (#120810 - Holiday Mini)
Stamp Set - Bells & Boughs (#120831 - Holiday Mini)
Crochet Trim - Victoria 5/8" (#188481)
Brads - Regals (#119737)
Ink - Always Artichoke, More Mustard,  Cajun Craze, Not Quite Navy, Night of Navy (Regals #119693),  Poppy Parade (#119782), Early Expresso (#119670)

Aquapainters (#103954)
Sponge Dauber (#102892)

Sunday, September 26, 2010

Christmas Postcard - Christmas Card

Inspired once more by the Mojo Monday Sketch (#157).  I created another Christmas Card using a fabulous vintage looking stamp!

I used watercolor paper, classic inks and an aqua pen to color in the image. 
Products used are all Stampin' Up! and can be purchased and delivered directly to your door by clicking the shopping link in the upper right corner of this page.

Products used (all Stampin' Up!):
  • Deck the Halls Designer Paper (#120810)
  • Always Artichoke Desinger Paper (from the regals collection - #117154)
  • Always Artichoke Cardstock (from the regals collection #119709)
  • Cherry Cobbler Cardstock (from the regals collection #119709)
  • Very Vanilla Satin Ribbon (#117291)
  • Basic Pearls (#119247) 
  • Aqua Painter (#103954)
  • Various Classic Ink Pads (to color in stamp - Poppy Parade (in color collection # 120952),(the remaining from the Regals Collection #119693) Cherry Cobbler, Garden Green, More Mustard, Not Quite Navy)
  • 3/4" Circle Punch (#119873)
  • Scallop Edge Border (#119882)

Sunday, September 19, 2010

Thinking Disney - Puppy Love!

I'm a mother of 3, that has never brought my kids to Disney.  A challenge came up on the Stampin' Up! Demonstrator Connection site to create using Disney as an inspiration.  While I haven't brought my youngsters to Disney yet, we do have a beautiful Shichon puppy (shih-tzu/bichon hybrid) that has joined our family this year.

I brought out the Cricut and cut the title and Mickey/Pluto die cuts, and added wonderful looking dimension using Stampin' Up! Stampin' Pastels, and added "shine" using the Uni-ball Signo Pen also from Stampin' Up!
Adding dimension using Stampin' Pastels is SO easy and SO worth it.  I didn't have a flesh colored paper, so I made my own using Whisper White carstock and Stampin' Pastels.  (I have an order in to get a collection of cardstock now - should be in next week sometime!)

I also used Make The Cut software and my Cricut and cut out a wonderful SVG from HeatherM's Blog to complete the layout.

I can't get enough of the Delightful Decorations stamp set, it is SO versatile.  I stamped a background on Crumb Cake cardstock using Versamark Ink to add interest to the background of the circle.  I also punched 1" circles of Certainly Celery to put behind the smaller circles that were cut out in the Cajun Craze, then used my Stamp-a-ma-jig to stamp into each of those smaller circles using Certainly Celery Ink.  I hadn't had enough with circles there, I stamped some more Delightful Decorations on Certainly Celery with Certainly Celery Ink and punched them out with a 3/4" circle punch.  I then mounted them on the negative space (from the small circles cut out of the large circle) adhered, and added a brad.  I accented two corners with three of these cute little embellishments!  I cut out and matted the photo using the Circle Scissor Plus!

completed layout
close-up of diecut
layout without photo

Remember you can order Stampin' Up! products from my Website, Click the Shop link in the upper right corner of this page and have Stampin' Up! products delivered directly to your door!)

Supplies Used (all Stampin' Up! unless otherwise Noted) -

Designer Series Paper - Marina Mist Stripe (from Subtles Patterns Designer Series Paper Stack #117152)

Cardstock -  Brights (Daffodil Delight, Real Red ), Regals (Cajun Craze), Subtles (Certainly Celery, Marina Mist ), Neutrals(Basic Black, Whisper White, Crumb Cake)

Brads - Marina Mist from Subtles Collection (#119738)

Tools - Stamp-a-ma-jig (#101049), Circle Scissor Plus (#112530), 1" Circle Punch (#119868), 3/4" Circle Punch (#119873), Color Coach (#121620)

Ink - VersaMark (#102283), Certainly Celery (#105217)

Stampin' Pastels (#120962)
uni-ball Signo Gel Pen (#105021)

Non-Stampin' Up! Tools/Supplies:
Cricut Electronic Die Cut Machine (ProvoCraft)
Mickey and Friends Cartridge (ProvoCraft)
Make The Cut Software
SVG file from HeatherM's Blog cut from Make The Cut software on the Cricut

Chalkboard Technique - using Whisper White Craft Ink and Shimmer Paint

I needed to come up with more Christmas Card samples, so I scoured the internet for card sketches, and came across Mojo Monday.  This is an excellent place for inspiration!  I used this sketch along with some supplies came up with this idea :
Taking pictures of the card turned out to be a difficult task, so I had to use a scanner because the shimmer paint was reflecting so much you couldn't see the bird :)

The scan still doesn't do it justice, the green leaves glow like neon in real life.

For instructions on the chalkboard technique - see here

*** chalkboard technique works with frost white shimmer paint, the shimmer shows through the chalk!! - I used shimmer paint for the pacific point colored snowflakes ***

Supply List - All Products from Stampin' Up! - I listed some of the product numbers next to the item - order from me online 24/7 by clicking the link on the right side of this page and have the products delivered directly to your door!

Designer Series Paper - Jolly Holiday (#117159 )

Cardstock - Very Vanilla (#101650 or in kit #119707), Basic Black (#121045 or in kit #119707), Old Olive (#100702 or in kit #119706)

Ribbon - Very Vanilla Satin Ribbon (#117291), Victoria Crochet Trim (#118481)

Ink - Whisper White Craft Ink (#101731), Chocolate Chip Classic Ink  (used for inking cardstock and papers, using sponge dauber)(single ink pad #100908 or in kit #119695)
Frost White Shimmer Paint (#116854)- applied directly to the stamp (used chalkboard technique over-top) using a sponge dauber (#102892 for a set of 12)

Stampin' Pastels (#120962 for all colors) used for the chalkboard technique

Stamps Used: Delightful Decorations (#116517), A Cardinal Christmas (#111760)

Sketch: Mojo Monday 156

http://mojomonday.blogspot.com/2010/09/mojo-monday-156.html